アプリケーション作成(認証導入①)
前日に引き続きアプリの開発を進めます。
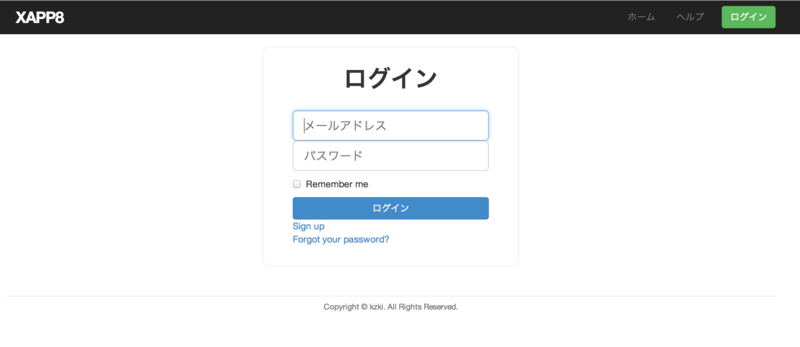
今回は認証画面の作成を行います。gemにdeviseという認証アプリがあるので、今回はそれを使ってログイン画面を作成しました。

■ とりあえず...
~/workspace/xapp9(master)$ git checkout -b "devise"
■ deviseをインストール
gemfileに認証用のgemである"devise"とユーザテストのサポートツールである"factory girl"を追加します。
./gemfile
# 認証機能追加
gem 'devise', '~>3.2'...
group :test do
gem 'selenium-webdriver', '~>2.35'
gem 'rspec-rails', '~>2.13'
gem 'capybara', '~>2.1'
gem 'factory_girl_rails', '~>4.2'
end
上記の設定が完了したら、インストールを行います。
~/workspace/xapp9(devise)$ bundle install
~/workspace/xapp9(devise)$ rails g devise:install
■ テストの設定
ファクトリー用の設定ファイルを作成します。
./spec/factories.rb
FactoryGirl.define do
factory :user do
email "xapp9@example.com"
password "password"
password_confirmation "password"
end
end
ホーム画面に「ログイン」のリンクが張れていることを確認するテストを作成します。
./spec/requests/static_pages_spec.rb
describe "Static pages" do
subject { page }
describe "Home page" do
before { visit root_path }
...
it { should have_link('ログイン', href: new_user_session_path) }
end
...
end
deviseで作成するモデルのテストを作成します。
./spec/models/user_spec.rb
describe User do
before { @user = User.new(email: "user@example.com", encrypted_password: "password") }
subject { @user }
it { should respond_to(:email) }
it { should respond_to(:encrypted_password) }
end
最後にログイン画面をテストするファイルを作成します。
./spec/requests/user_pages_spec.rb
require 'spec_helper'
describe "ユーザー画面" do
subject { page }
describe "ログインテスト" do
before { visit new_user_session_path }
describe "誤ったログイン" do
before { click_button "ログイン" }it { should have_title('ログイン') }
it { should have_selector('div.alert.alert-error', text: 'Invalid email or password') }
enddescribe "正しいログイン" do
let(:user) { FactoryGirl.create(:user) }
before do
fill_in "Email", with: user.email.upcase
fill_in "Password", with: user.password
click_button "ログイン"
end
it { should have_selector('div.alert.alert-notice', text: 'Signed in successfully') }
it { should have_link('ユーザの編集', edit_user_registration_path) }
it { should have_link('ログアウト', href: destroy_user_session_path) }
it { should_not have_link('ログイン', href: new_user_session_path) }
end
end
end
■ deviseの初期設定
まずはURLを設定します。nitrousなのでlocalhostではなくて与えられたURLをdevelopment.rbの末尾にセットします。
./config/environments/development.rb
# Devise setup
config.action_mailer.default_url_options = { host: 'http://app.apne1.nitrousbox.com:3000' }
次にログインの正否を表示する為のコードを挿入します。
./app/views/layouts/application.html.erb
<div class="container">
<% if notice %><div class="alert alert-notice"><%= notice %></div><% end %>
<% if alert %><div class="alert alert-error"><%= alert %></div><% end %>
<%= yield %>
<%= render 'layouts/footer' %>
</div>
ユーザーモデルを作成して、データベースを作成します。
~/workspace/xapp9(devise*)$ rails g devise user
~/workspace/xapp9(devise*)$ rake db:migrate
最後にHome画面からログインできるようにURLを設定します。
./app/views/layouts/_header.html.erb
<ul class="nav navbar-nav navbar-right nav-pills">
<li><%= link_to "ホーム", root_path %></li>
<li><%= link_to "ヘルプ", help_path %></li>
<!-- ログイン状態によってメニューを変化 -->
<% if user_signed_in? %>
<li class="dropdown">
<a href="#" data-toggle="dropdown" class="bold"><%= current_user.email %><b class="caret"></b></a>
<ul class="dropdown-menu">
<li><%= link_to "ユーザの編集", edit_user_registration_path, :class => 'navbar-link' %></li>
<li class="divider"></li>
<li><%= link_to "ログアウト", destroy_user_session_path, method: :delete, :class => 'navbar-link' %></li>
</ul>
</li>
<% else %>
<li><%= button_to "ログイン", new_user_session_path, :class => "btn btn-success navbar-btn", :method => :get %></li>
<% end %>
</ul>
そして、ホーム画面でユーザーを作成できるように変更します。
./app/views/static_pages/home.html.erb
<div class="jumbotron">
...<%= link_to "アカウントを作成", new_user_registration_path, class: "btn btn-large btn-primary" %>
</div>
本番環境ではSSLが適用されるように設定を変更します。
./config/environments/production.rb
SampleApp::Application.configure do
...
# Force all access to the app over SSL, use Strict-Transport-Security,
# and use secure cookies.
config.force_ssl = true
...
end
■ 見た目の編集
deviseの生成するログインフォームはbootstrapに対応していないので、単純に導入をしても以下のような画面になってしまいます。

このため、deviseのビューを編集する必要があります。以下のコマンドを実行して、deviseのビューを生成します。
~/workspace/xapp9(devise*)$ rails g devise:views
まずはログイン画面の修正から。
./app/views/devise/sessions/new.html.erb
<div class="container">
<div class="row">
<div class="col-md-4 col-md-offset-4 login"><h1 class="text-center title">ログイン</h1>
<%= form_for(resource, as: resource_name, url: session_path(resource_name), :class => "form-signin") do |f| %>
<%= f.email_field :email, :class => "form-control input-lg", :placeholder => "メールアドレス", autofocus: true %>
<%= f.password_field :password, :class => "form-control input-lg", :placeholder => "パスワード", autocomplete: "off" %>
<% if devise_mapping.rememberable? -%>
<div class="checkbox"><%= f.check_box :remember_me %> <%= f.label :remember_me %></div>
<% end -%>
<%= f.submit "ログイン", :class => "btn btn-primary btn-block" %>
<% end %>
<%= render "devise/shared/links" %>
</div>
</div>
</div> <!-- /container -->
同様にユーザ登録画面とユーザ情報修正画面を修正します。
./app/views/devise/registrations/new.html.erb
./app/views/devise/registrations/edit.html.erb
■ 最後に
いつもの作業をします。
~/workspace/xapp9(devise*)$ git add .
~/workspace/xapp9(devise)$ git commit -m"deviseインストール"
~/workspace/xapp9(devise)$ git checkout master
~/workspace/xapp9(master)$ git merge devise
~/workspace/xapp9(master)$ git push
~/workspace/xapp9(master)$ git push heroku
~/workspace/xapp9(master)$ heroku rake db:migrate